n8n integration.
Pause n8n workflows and require human approval before continuing.
n8n is a visual workflow automation tool. This guide walks you through every node, every field, and every click needed to add human approval to any n8n workflow — no coding required.
How it works
The overall pattern:
- An AI node (or any node) generates content — e.g. an email draft
- A Code node parses the AI output into clean fields your later nodes can reference
- An HTTP Request node sends the decision to The Handover and gets back a decision
id - A Wait node pauses the workflow
- Another HTTP Request node checks whether a decision has been made
- An IF node branches: loop back to wait if still pending, or continue if resolved
- A final IF node routes to your approved or denied path
- The action node (Gmail, Slack, etc.) references the parsed fields by node name
Step 1: Create a Header Auth credential
You need to store your API key once so every HTTP Request node can use it securely.
- In the n8n sidebar, go to Settings → Credentials
- Click + Add credential
- Search for and select Header Auth
- Fill in the two fields:
- Name:
Authorization - Value:
Bearer ho_your_api_key_here
- Name:
- Click Save and give it a name like The Handover
Where to find your API key: Log in to your dashboard, go to API Keys, and copy your key. It starts with ho_.
You can also use the cURL import shortcut — open any HTTP Request node, click the Import cURL button at the top, and paste this (replace the key):
curl -X POST https://thehandover.xyz/decisions -H "Authorization: Bearer ho_your_key" -H "Content-Type: application/json" -d '{"action":"Test","approver":"you@example.com","urgency":"medium"}'n8n will pre-fill the method, URL, headers, and body automatically.
Step 2: Parse your AI node's output (if using an AI agent)
AI nodes in n8n return their output as a raw string — often wrapped in markdown code fences like ```json ... ```. This means you can only reference {{ $json.output }}, not individual fields like {{ $json.subject }}.
To fix this, add a Code node directly after your AI node:
- Add a Code node and set the language to JavaScript
- Paste this code:
const raw = $input.first().json.output;
const cleaned = raw.replace(/```jsons*/g, '').replace(/```/g, '').trim();
const parsed = JSON.parse(cleaned);
return [{ json: parsed }];
After this node, {{ $json.receiver }}, {{ $json.subject }}, and {{ $json.message }} (or whatever fields your AI returns) are all available.
Important: Later nodes like Gmail run after the polling loop, so $json at that point refers to the IF node's output, not the parsed email. Always reference the Parse node explicitly by name: $('Parse Email Output').first().json.subject — replace Parse Email Output with whatever you named the Code node.
Step 3: Add the "Create Decision" node
Add an HTTP Request node to your workflow at the point where you need approval. Configure it as follows:
- Method:
POST - URL:
https://thehandover.xyz/decisions - Authentication:
Generic Credential Type→Header Auth→ select the credential you created in Step 1 - Body Content Type:
JSON - Specify Body:
Using JSON - JSON body:
{
  "action":   "{{ $json.action_description }}",
  "context":  "{{ $json.context }}",
  "approver": "approver@yourcompany.com",
  "urgency":  "high",
  "timeout_minutes": 60
}
Replace {{ $json.action_description }} and {{ $json.context }} with expressions that reference data from earlier nodes, or hard-code plain text strings. Replace approver@yourcompany.com with the email of the person who should approve.
The response will look like:
{
  "id": "abc-123",
  "status": "pending",
  "expires_at": "2024-01-01T13:00:00Z"
}
The id is what you'll use to check the result. n8n automatically makes this available as {{ $json.id }} in the next node.
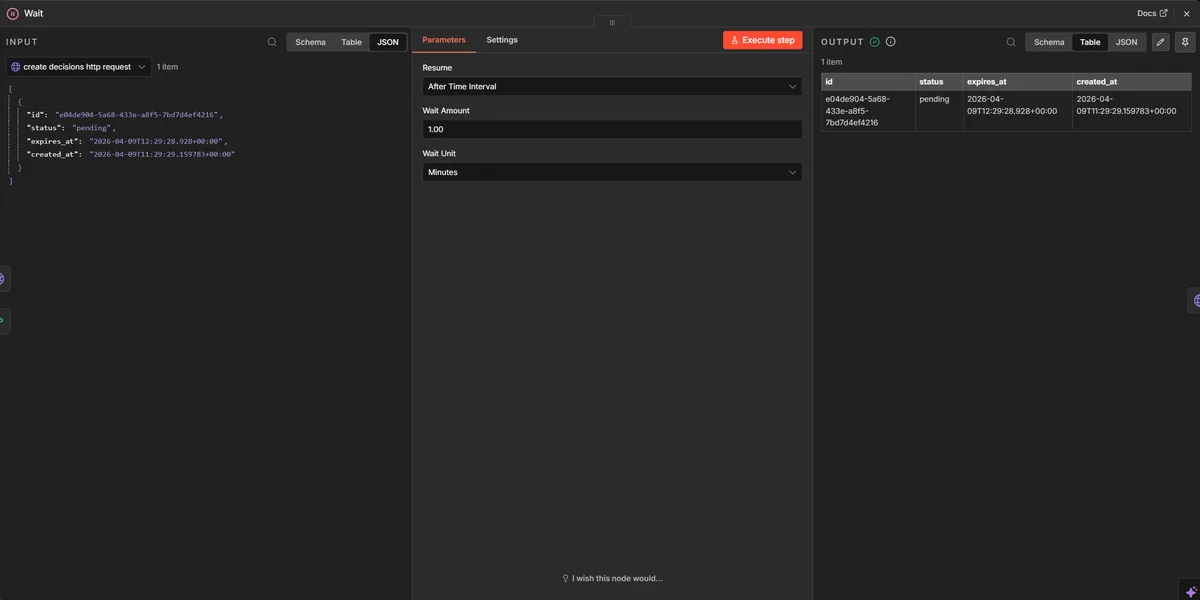
Step 4: Add a Wait node
Add a Wait node directly after the Create Decision node. This pauses the workflow while the approver reviews.
- Resume:
After Time Interval - Wait Amount:
1 - Wait Unit:
Minutes
This means n8n will check for a result every minute. You can set a longer interval if your approvers typically take more time — just make sure it's shorter than your timeout_minutes.
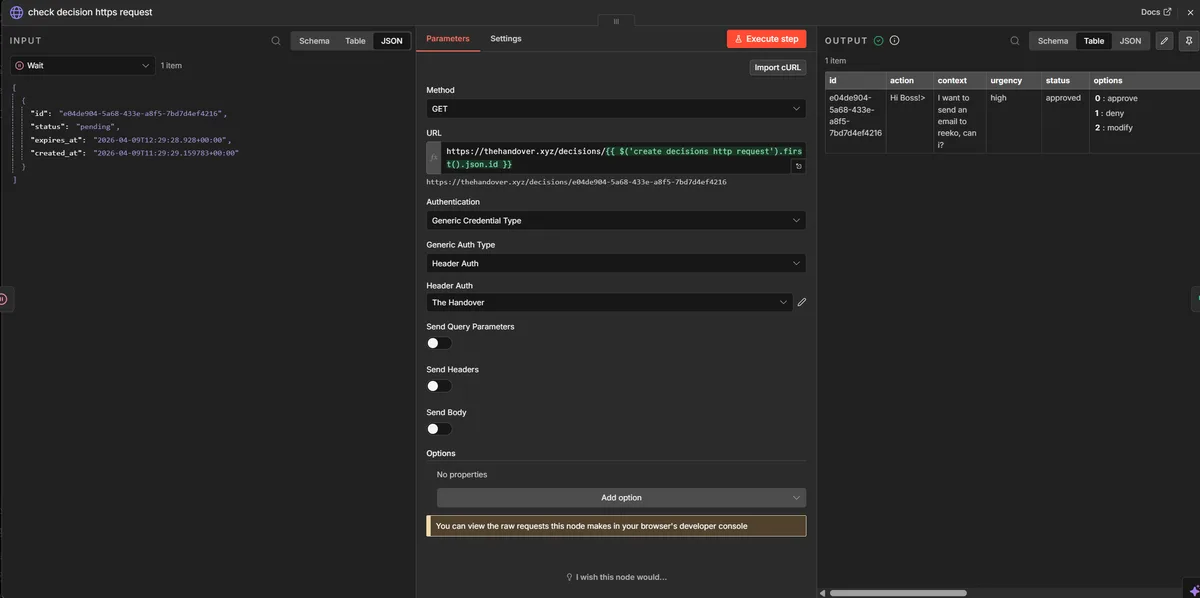
Step 5: Add the "Check Decision" node
After the Wait node, add another HTTP Request node to check the decision status:
- Method:
GET - URL:
https://thehandover.xyz/decisions/{{ $('Create Decision').first().json.id }} - Authentication: Same
Header Authcredential as before
The expression {{ $('Create Decision').first().json.id }} reaches back to the first node (replace Create Decision with whatever you named that node) and pulls out the id from its output.
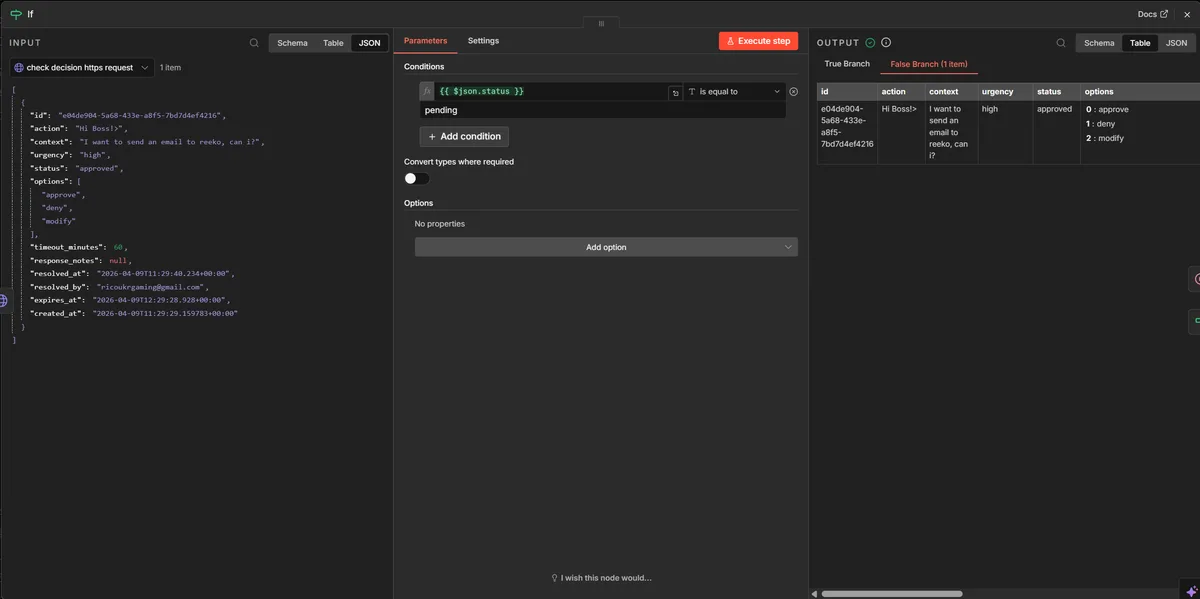
Step 6: Add an IF node — "Still pending?"
Add an IF node after the Check Decision node to decide whether to wait again or move on:
- Condition 1:
- Value 1:
{{ $json.status }} - Operation:
is equal to - Value 2:
pending
- Value 1:
Connect the true output back to the Wait node (creating the polling loop). Connect the false output to the next step.
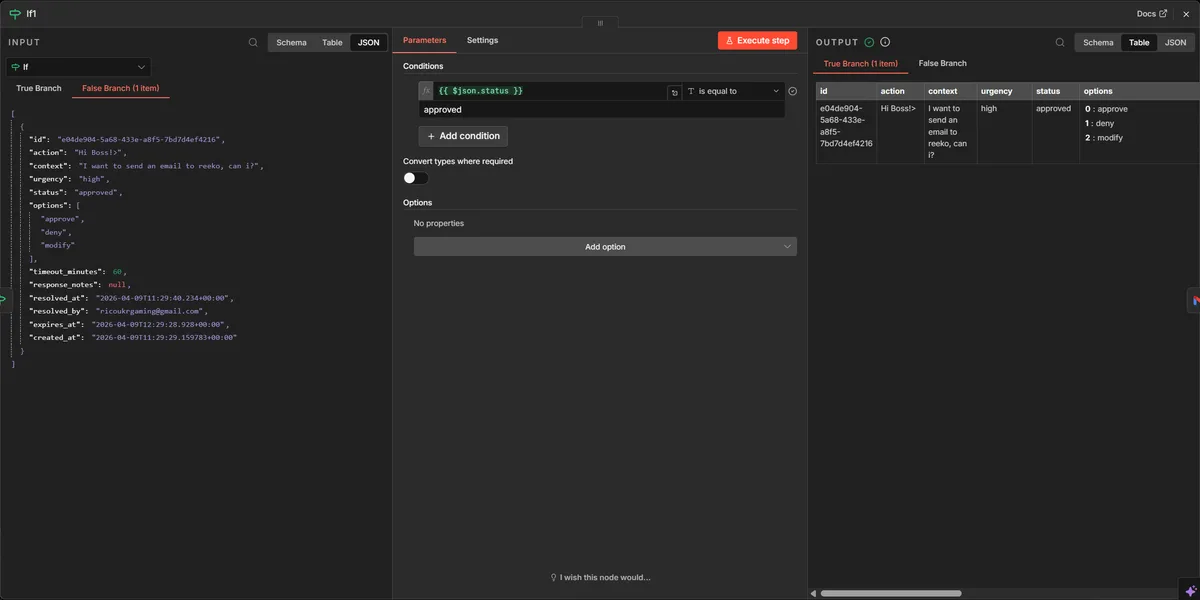
Step 7: Add an IF node — "Approved or denied?"
Add a second IF node on the false path from Step 6:
- Condition 1:
- Value 1:
{{ $json.status }} - Operation:
is equal to - Value 2:
approved
- Value 1:
Connect the outputs to whatever should happen next:
- true (approved) → continue your workflow
- false (denied or modified) → send a notification, log the result, or stop
Accessing the approver's notes: If you allow modified responses, the approver's feedback is in {{ $json.response_notes }}. You can use this in a follow-up node to adjust what the workflow does next.
Faster alternative: Webhook callback
Instead of polling every minute, you can have The Handover call your n8n workflow the instant a decision is made. This is faster and uses fewer executions.
- Add a Webhook node to your workflow and copy its URL
- In your Create Decision HTTP Request body, add:
"callback_url": "https://your-n8n.example.com/webhook/abc123" - The Handover will POST the resolved decision to that URL the moment the approver clicks — no polling needed
The webhook payload includes id, status, response_notes, and all original decision fields.
Minimal working example
This is a complete walkthrough of a real workflow: an AI agent generates a personalised email, a human approves it, and then Gmail sends it. Every screenshot shows the exact settings used.
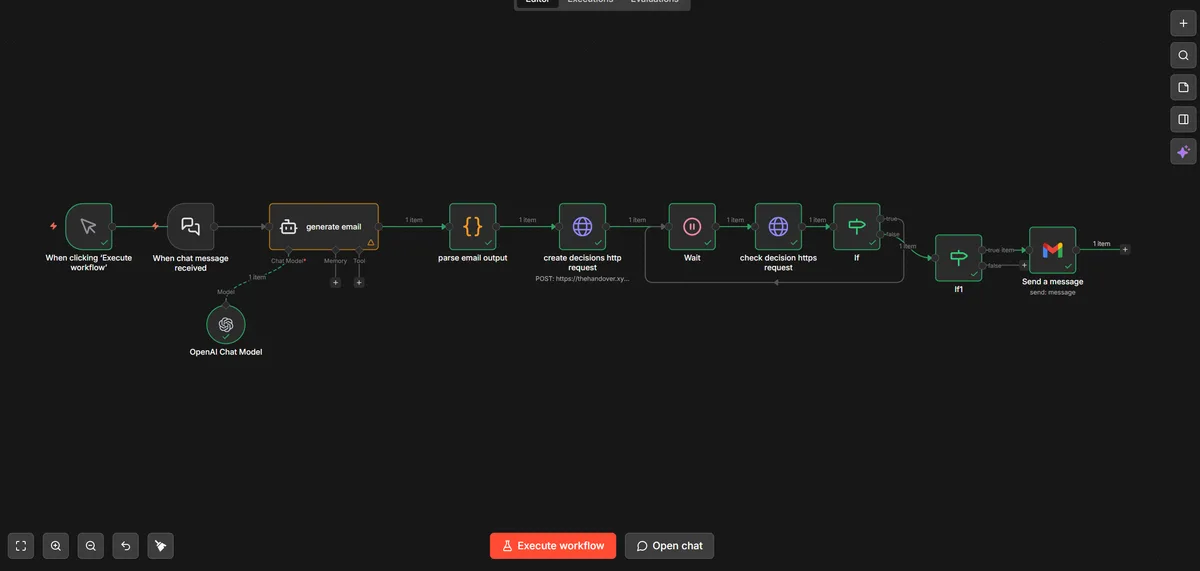
Complete workflow
The final layout in n8n — nodes connected left to right, with the polling loop visible between Wait and IF 1.
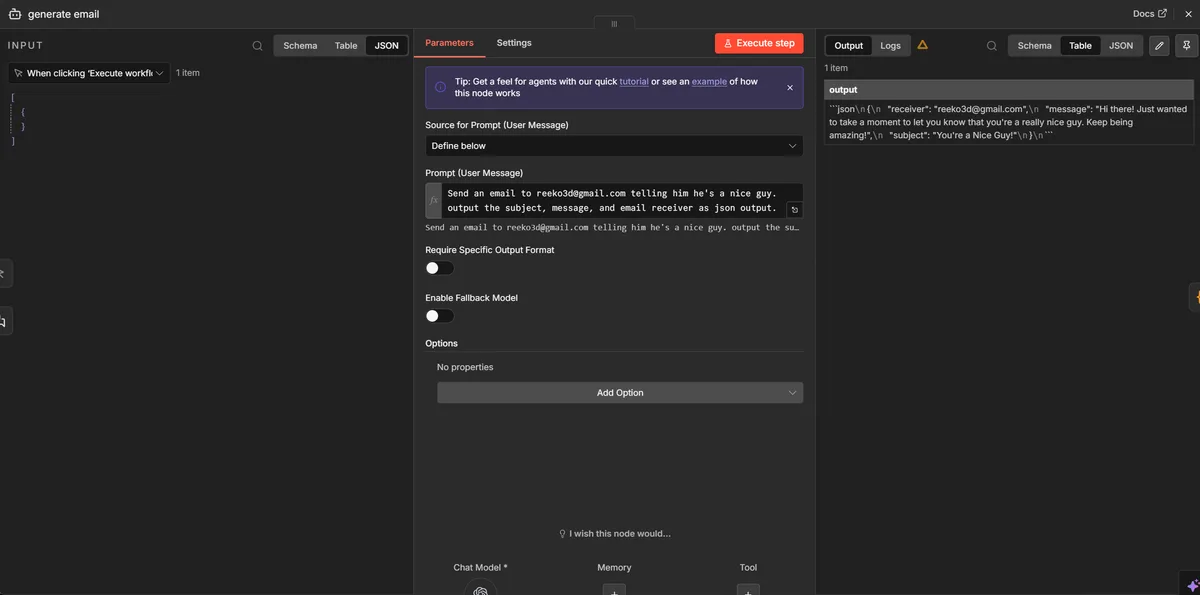
Node 1 — Generate Email (AI Agent)
The AI agent is prompted to produce a JSON object with receiver, subject, and message fields. The raw output is a string — that's handled by the next node.
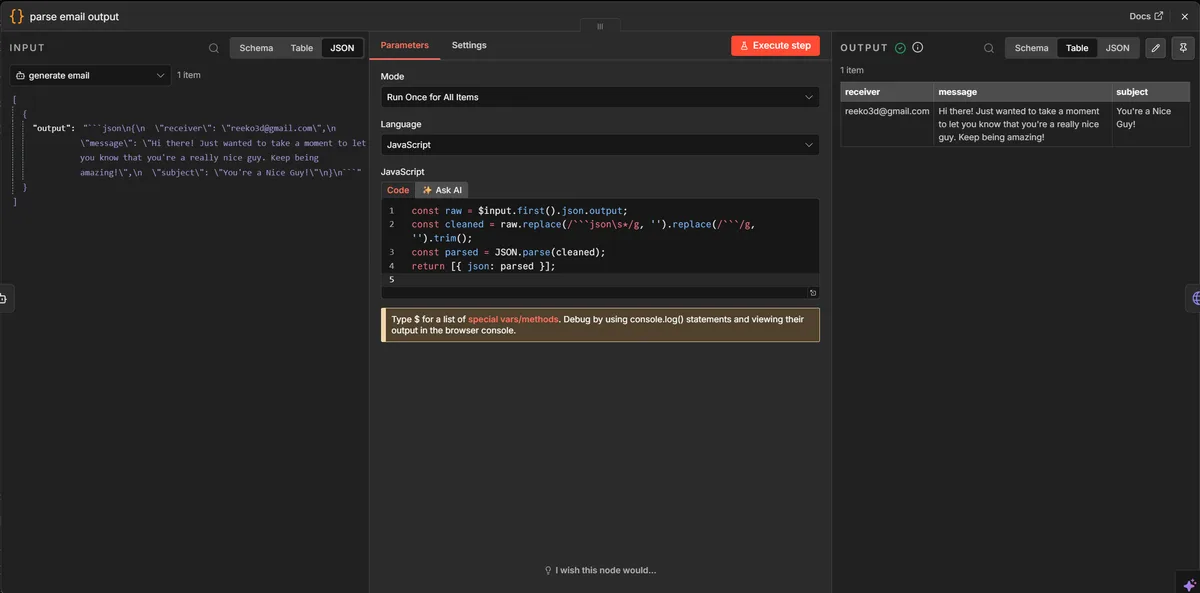
Node 2 — Parse Email Output (Code node)
Strips the markdown code fences and parses the JSON string into a proper object. After this node, $json.receiver, $json.subject, and $json.message are all available — but reference them by node name later in the workflow.
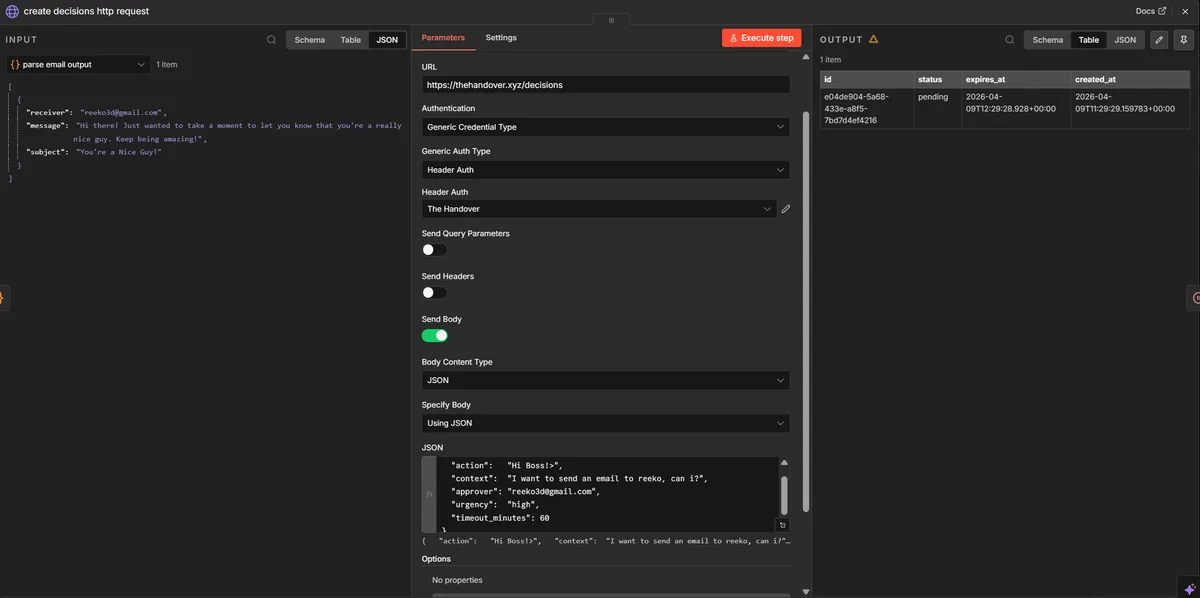
Node 3 — Create Decision (HTTP Request)
POST to /decisions with the action description and approver email. The action field references the parsed subject so the approver sees exactly what they're approving.
Node 4 — Wait
Pauses for 1 minute before checking. The true output of IF 1 loops back here, creating the polling cycle.
Node 5 — Check Decision (HTTP Request)
GET the decision using the ID saved from Node 3. Note the expression reaching back to Create Decision by node name.
Node 6 — IF 1: Still pending?
Checks if status is pending. True loops back to the Wait node. False means a decision has been made — continue to IF 2.
Node 7 — IF 2: Approved?
Checks if status is approved. True goes to Gmail. False goes to a log or notification node.
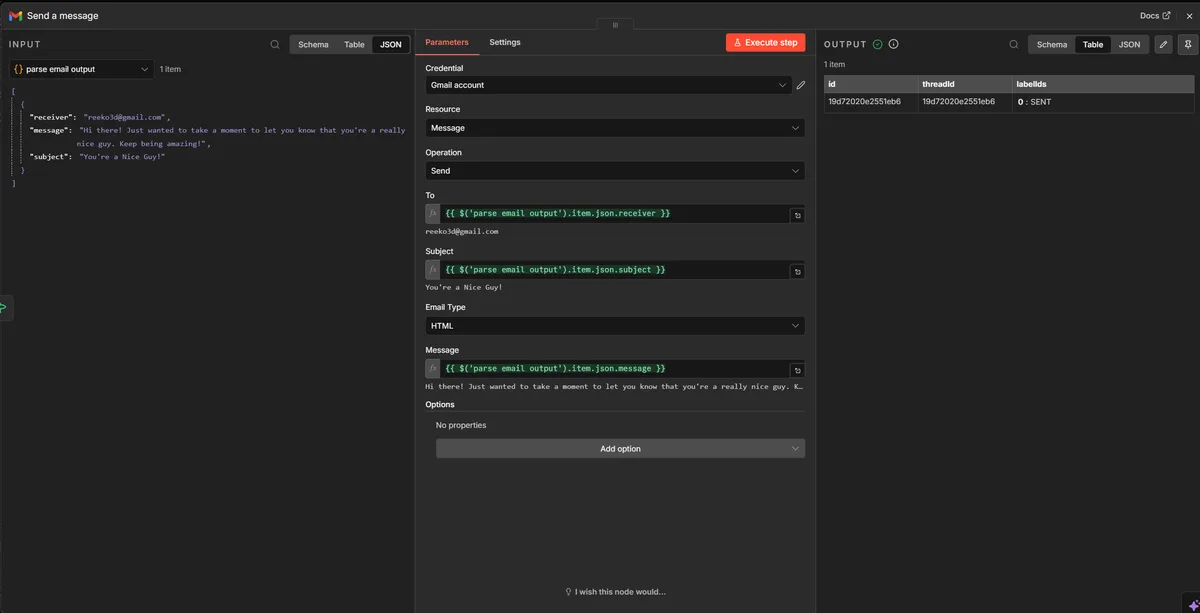
Node 8 — Send Email (Gmail)
References the Parse node by name to get the email fields. If you used $json.subject here it would fail — you must use $('Parse Email Output').first().json.subject because $json at this point is the IF 2 output.
Common mistakes
- Referencing
$json.fieldafter the polling loop — by the time Gmail (or any final node) runs,$jsonis the IF node's output, not the parsed email. Always reach back to the Parse node explicitly:$('Parse Email Output').first().json.subject. - AI output not parsed — if your AI agent wraps output in
```jsonfences, trying to use$json.subjectdirectly will fail with undefined. Add the Code node from Step 2 to strip and parse first. - Expression references the wrong node name — the name in
$('Node Name')must match exactly, including capitalisation. Click the node and check the name in the top-left of its panel. - Decision ID gets lost in the loop — n8n only carries the output of the most recent node into the next. Reference the Create Decision node by name (
$('Create Decision').first().json.id) rather than$json.idonce you're past the first node. - Wait node set too short — intervals under 65 seconds keep the workflow in memory. If your n8n instance restarts during that window, the execution is lost. Use at least 2 minutes for robustness.
- Credential not linked — setting Authentication to "Header Auth" without selecting the saved credential from the dropdown will send requests without auth and get a 401 error.
Common use cases
- Approve AI-generated emails or messages before they're sent
- Confirm invoice or payment processing
- Review CRM record updates or deletions
- Gate outbound API calls to billing, HR, or ERP systems
- Human sign-off on automated social media posts
Ready to add human oversight?
Free to start. No credit card required. Five minutes to integrate.
Get Started Free